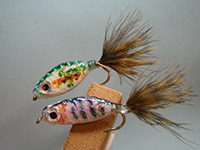
THE FOAM MINNOW
PHIL ROWLEY Translated by CARL WUEBBENPredatory trout accustomed to supplementing their diet with minnows, fry or other baitfish often herd and chase their prey into shallow areas or drive them to the surface where they ambush them from below. In order to be successful using minnow or fry patterns it is important to keep your fly high in the water. Line choice helps but having a buoyant pattern is a definite asset. This is very easy and fun to tie – you can get very creative in the colors also
PATTERN
HOOK – mustad R74-9672, #6 - #10
THREAD – GSP, white – 6/0 white works also
TAIL – UV2 grizzly soft hackle, olive or brown. Regular marabou and fur clumps can also be used. The barred markings of a dyed grizzly feather suggest the banded markings common to trout or salmon fry and many small minnows.
UNDERBODY – 2 mm sheet of white foam cut into strips the size of the hook gape
OVERBODY – Mylar piping, pearlescent or pearlescent dyed olive.
EYES – Stick on eyes – bend the eye in half to better form to the body.
GLUE – Gel zap-a-gap or gel superglue and thin UV glue and a curing light for it.TYING NOTES
- Use permanent marker to color and mark the body to match your local baitfish or fry.
- You can put the markings on the underbody or the overbody but I have found that if you do it on the underbody (foam) first it worked better as long as you put one color on then a thin coat of thin UV glue and a quick curing with the light then the next color and a curing and so on with each color then bring the Mylar piping over the underbody.
- After curing the last coat of UV glue take a little bit of hand sanitizer and lightly rub it on the fly body to remove the tacky feeling that the glue gives off then put a coat of Sally Hansen’s hard as nails (Head cement) on it and let it dry fully.
HOW TO TIE
- Debarb hook only if you want to on this one – take the 2mm white foam and cut into strips the size of the hook gape. Now hold the strip up to the hook shank and measure out a piece the length of the shank (behind the eye to just in front of the hook bend) then double it and cut it. Now take the doubled over foam and put the hook point thru the center of the foam in the bent over part – then bring it forward to the eyelet.
- Use some gel superglue or zap-a-gap gel and put it on the shank of the hook and a little on one of the inner sides of one side of the foam. This glue helps things stay in position and not run all over the place. Now bring the two sides together along the side of the hook shank and make sure it is centered then press firmly on the body to hold the foam together and onto the hook shank. Make sure it all stays together and remove any glue that may have squished out. Leave about two eyelets space from the eyelet so you can tie in the piping.
- Shape the foam underbody so it tapers at each end resembling the basic shape of a baitfish. Don’t worry if it’s a little squared off on the corner because the piping will cover them and give it the nice rounded shape. Just shape carefully because with each cut you are removing floatation and you can’t glue it back on.
- (See tying notes #1 and #2 for an option at this point). Attach the thread behind the eye then grab your Mylar piping and tie it on in front of the foam and wrap your thread up close to the eyelet (but not so close as to crowd the head) then loosely spiral wrap over your body to get to the back of the foam – then strip a small clump of soft feather from the base of a dyed olive or brown grizzly hackle (can use regular or grizzly marabou as I did) and tie in the hackle tuft at the rear of the shank. The tail should be no more than half the shank length. The barred markings of the feather suggest the banded markings common to trout or salmon fry and many small minnows.
- Darken the back of the foam (top) dark olive using a permanent marker – let it dry a few minutes then coat it with a little thin UV glue and cure it with the UV light – then using your thumb and forefinger, stroke and pull the Mylar piping back over itself along the shank. Pull the Mylar piping tight at the rear of the hook. Now using a bodkin pick thru the fibers in the Mylar where the hook bend is so you can tie in the piping. Put a few thread wraps down to hold the piping in place. You now either clip out the piping filaments in the tail or leave a few or clip them out altogether. Don’t worry about the blunt nose this method creates it better mimics the look of many minnows or fry. Color the thread holding the tail parts together with the marker (same color as the back). Whip finish the fly at the tail area -clip off the thread –apply a small dab of superglue or zap-a-gap at the rear tie off point for added security.
- Now using the permanent markers apply the body markings like a dark olive back you already have on, red gill slashes and black vertical bars along both sides of the body. Now wait for it to dry. But I like to apply one color then some thin UV glue with a UV light curing then another color then more thin UV glue and a curing and so on. This keeps the colors from bleeding so much.
- With a bodkin, apply the stick on eyes to each side – fold the eye a little bit in half while it’s still on the paper so it fits the rounded body profile better.
- Coat the entire fly (accept the tail and eyelet) including the eyes with 2 to 3 coats of thin UV glue and a curing after each coat- do small sections at a time so it won’t run and leave bumps- thin coats ensure a smooth even build up. Now see tying tip #3 and you’re done.
*** But remember to practice C.P.R. (CATCH – PICTURE – RELEASE).