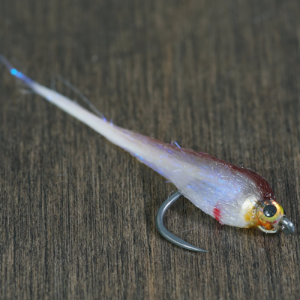
Baby Fat Minnow
Clark Pierce / FLYFISHFOOD.COM

Translated by Carl WuebbenGreat for bass, it crushes fish, very durable; fish key in on this fly and is a perfect baitfish fly. It’s a sized down version of the low fat minnow. Very transparent and veny looking, the dubbing in front pushes water and allows fish to pick micro vibrations. The marabou tail gives this fly incredible movement. It’s also a very productive trout streamer. Cast out and let it sit a little then strip in. Try tying it in your favorite baitfish colors.
PATTERN
HOOK – Fulling mill Bonio barbless carp hook #8 or Firehole 315 in #6 or#8, can also use barbed one but pinch off the barb before tying.
THREAD – Danville flat waxed nylon 70 denier (8/0) in white
BEAD – (Optional) Plummeting tungsten bead in nickel 7/64ths (2.8mm) to keel it.
EYE – 3d holographic eyes 1/8 inch in super pearl.
BODY – Ice dub UV Callibaetis (#ice50 from Hareline dubbing Inc.) can also use in UV pearl – UV tan –UV dark dun. You can also try a ripple ice dub.
TAIL – Fish hunter UV marabou fl. White / white spay hackle chickabou.
HEAD – Bruiser blend junior (very sparse) by Hareline dubbing / hareline.co TOP- holographic grey BOTTOM- cream.
MARKER – TOP – brown (sharpie or chartpak)
BOTTOM – marigold in sharpie or goldenrod in chartpak GILLS – red (fine point)
OTHER THINGS NEEDED - Loon UV glue in flow and thick and also UV clear fly finish and a UV light to cure it.
HOW TO TIE
- Put bead on hook - mount hook in vise – push the bead toward the eye and start your thread in at above the barb area on the shank and go forward toward the eye to just before the halfway mark on the shank then push the bead rearward to the halfway mark on the shank. Make sure you have enough room to place the eye on later (eye will sit between the hook eye and the bead). Now with your thread use crossover wraps (figure 8’s) like you’re tying in a dumbbell eye to put a thread dam in front and behind the bead. Bring the thread behind the bead.
- With your thread tie in a sparse single marabou feather for the tail in behind the bead with the tips hanging rearward to about two hook shank lengths long. Then clip off the marabou tag end.
- Grab a little UV dubbing and make a small dubbing noodle (twist between thumb and index finger) and wrap a small ball behind the bead to cover the thread some. Leave thread behind the bead.
- While still behind the bead and using the same UV ice dubbing pull some loose from the top of the bag but leave it wispy, then lay it on top of the hook and pinch it so you force it all around the shank with a slight twist of your fingers it will look like a mess. Make one or two loose wraps around the middle of the dubbing then a couple tighter ones to secure it. Then with your fingers brush it all rearward and put some wraps in front of it to hold it rearward (this is called a clump dub technique). Use a brush to comb it out. Bring your thread forward in front of the bead and cover the shank with thread from the eyelet to the bead.
- Grab a very sparse clump of the grey bruiser blend junior ( use your fingers to pull apart and put back to align the fibers) then tie it in on top with half of it forward and half rearward then do the same with the cream on the bottom. Fan the fibers out some. Push back the top fibers and tie off then do the same with the bottom fibers. Make a thread head then whip finish and clip your thread. Take the fibers and work some of them to the sides (both top and bottom) and brush them out.
- Now using the brown marker and on the top front end put a little on and using your fingers push it in rearward to blend it in (may have to do a couple of times) flip your fly over and on the bottom put a little marigold yellow color on (just a small section) then use your fingers to blend in rearward. With a red fine point sharpie make some gills on the lower half in above the hook point area.
- Grab a pair of plyers that have a flat jaw (no grooves) and flatten the thread head area on the sides so you can put the eyes on better. Stick one eye on each side and align them even then with some flow UV glue put some between the eyes on top and while squeezing the eyes hit it with a UV light. Now flip the fly over and do the same on the bottom of the eyes. Now with the thick UV glue put some on all around the eye area (top-bottom-sides) but not too much (but if you do put too much on use your bodkin to remove the extra ) using your bodkin push the glue rearward and into the area just behind the eyes. Hit it with a UV light. The thick glue is tacky so use some of the flow again to coat the eye area and hit it with the UV light and you’re done.
TIE UP A DOZEN OR TWO – AND GO FISHING*** But remember to practice C.P.R. (CATCH – PICTURE – RELEASE)


