Chuck CaddisEric Leiser - Chris Hunt - Tim FlaglerTranslated by Carl Wuebben
Caddis patterns come in all shapes and sizes – some are a little more artsy and impressionistic, and others appear more practical and representive of the flies that are actually on the water. Maybe the simplest of caddis patterns like the chuck caddis can be “extremely suggestive”, simple and a little bit elegant too and it’s tied using all natural ingredients. Put the chuck caddis to work, it’s an excellent pattern for spring caddis hatches.
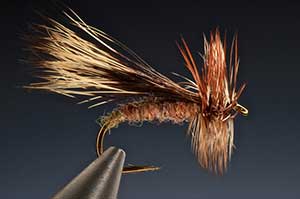
PATTERN
HOOK – Fulling Mill # 35050 dry fly size #14 or equivalent (dry fly 1x wide standard wire)
THREAD – Black UTC 70 denier (8/0) or equivalent
BODY – Packaged hares mask dubbing (original was woodchuck underfur) but you should also feel free to substitute it out for whatever dubbing material you have on your bench.
WING – Woodchuck (with a good range of colors in it –bottom to tip of hair)
HACKLE – One Cree feather (dark barred dun color). Traditionally it was one grizzly and one brown feather used, you can get them easier and you may have already
HOW TO TIE
- Mount hook in the vice. Start your thread in on the hook about 2 eyelets space from the eye of the hook and clip your tag end off. Wrap rearward to make a smooth thread base ending at about the hook point.
- Dub about a two inch noodle using the hares mask dubbing by twisting the dubbing between your thumb and index finger onto the thread leaving just a small amount of bare thread just before the hook so you as you start to wrap the body you will go rearward first to the bend of the hook till the noodle starts onto the shank then go forward to where you started your thread and tie it off –clip the tag end off.
- Grab your woodchuck and snip a small clump from the hide and grab the tips in one hand and with the other pull out the short hairs and throw them out. Place the longer hair into a hair stacker tips first – tap on the table a couple times, open the stacker so the tips are hanging out toward the rear of the fly - now grab the tips and keep them aligned and tie them in where your thread is now and the tips facing rearward (just a little longer than the hook.) Wrap down toward the eye with a neat tapper and holding tight as the hair is slippery. Clip the ends off and continue the thread taper. Then bring your thread back again to a little bit before the tie in area or where you ended the body.
- Now if you’re tying it the traditional way you will use one grizzly and one brown hackle or use a single Cree feather (dark barred dun) – size it up to the hook gape before plucking from the hide. Now flip the feather over so the dull side is facing away from you then strip off the fluffy fibers then remove about ½ dozen more fibers from the top. With the shiny side facing you lay the stem on the near side of the hook with the tip facing forward toward the eye and tie in with a short bare section of the feather showing – clip the feather tag end off and wrap forward toward the eye then back to the wing base forming a clean tapered thorax area. Grab a pair of hackle plyers then grab the feather by its tip with it and pull the feather rearward to crease the stem then take touching wraps rearward with it (this pattern works well with a fairly substantial hackle collar) then when you reach your thread give your bobbin a clockwise spin to cord it up and strengthen and decrease the size of the thread now use it to tie down the feather but don’t clip it yet. Now using the thread counter wrap the fragile feather stem and when you get to the eye pull back the hackle and put down a couple more wraps to hold it back then whip finish and clip the thread. Use a hobby knife to clip the hackle tip off as this will keep you from clipping off the feather fibers you want to keep just lay it up against the feather stem and pull back up against the knife to cut it cleanly.
TIE UP A DOZEN OR TWO – AND GO FISHING*** But remember to practice C.P.R. (CATCH – PICTURE – RELEASE)