The Bead WormPhilip RowleyTranslated by Carl Wuebben
Stillwater featuring muddy bottoms are home to epidemic populations of chironomid’s many reaching appreciable sizes. Larva, pupa and adults of the larger chironomid species have been affectionately christened “BOMBERS”, a season long morsel few trout resist. In the early spring and late fall these lesser known Stillwater staples migrate. In the spring larvae migrate from the deep to the shallows and vice versa in the fall as the larva escape the lethal effects of the approaching winter. Other aquatic insects mirror this behavior and as a result anglers should consider deep to shallow presentations in the spring and shallow to deep water in the fall. The bead worm targets the more mature stages of the chironomid life cycle. The contrasting V-rib and wire segmentation over the holographic Mylar make a convincing imitation. Although many anglers are familiar with red or maroon colored larva there are species displaying a unique barber pole combination of green and red and for this larval color scheme consider the holographic green and red combination. Whatever the choice present this design near the bottom. Use a floating line and long leader of 15 feet or more. Leaders should be 25 percent longer than the water is deep.
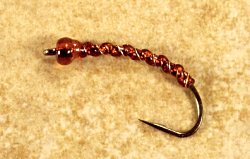
PATTERN
HOOK – Klinkhamer 1160 or 1170 in size 12 to16
THREAD – Red 8/0 (70denier)
BODY- Red or green holographic Mylar
RIB #1 – Red V-rib
RIB #2 – Fine gold, copper or silver wire
HEAD – 8/0 glass bead
HOW TO TIE
- De-barb the hook and slide a red glass bead onto the shank and push forward to the hook eye. Place the hook into the vise. Attach the tying thread directly behind the glass bead and cover the hook shank with a thread base (you should be at the rear of the hook now). Using open wraps spiral the tying thread back to the rear of the glass bead. Tie in the #2 ribbing (wire) material along the entire length of the hook (on one side or the top).
- With the thread at the rear again. Take a length of V-rib and trim one end to a point.
- Tie in the V-rib by the point on top of the hook shank (in the rear) so the flat side faces upward. Once initially tied in by the point, pull on the V-rib to reduce bulk, use tight thread wraps to secure. Tie in the red holographic Mylar in place along the side of the hook shank. Advance the tying thread forward to the rear of the bead.
- Wind the holographic Mylar forward over the hook shank in close touching turns. There should be no gaps between the wraps. Use appropriate tension when wrapping to keep the body slender and neat. Wind the V-rib forward in open wraps. Position the V-rib during the initial wrap so that the round side faces out. Tie off and clip the tag end off. Spiral the wire rib along either the front edge or rear edge of the V-rib. Tie the wire off and twist and pull it (helicopter) to break away the tag end.
- Cover the tie off area behind the bead with tying thread then whip finish and clip the thread off then coat the entire fly with brushable super glue or U.V. glue for added durability and shine.
TIE UP A DOZEN OR TWO – AND GO FISHING*** But remember to practice C.P.R. (CATCH – PICTURE – RELEASE)