Pheasant Tail Nymph
Frank Sawyer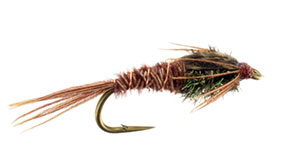
Translated by Carl Wuebben
Fibers such as peacock, pheasant tail, and even ostrich or marabou attract a good amount of trout when they’re wound as herl. Is it the minute points of light that each tiny barbule reflects or the way they quiver in the water more than likely both. The pheasant tail nymph is a key fly everyone should have in their fly box. The pheasant tail represents nymphs of the prolific little olive (baetis) mayfly group, so abundant in spring creeks and tail waters. You can also tie it with a bead head.
PATTERN
HOOK – Standard nymph, sizes #14 - #16 - #18 - #20 -#22.
THREAD – Brown 6/0 or 8/0.
TAILS – Ring neck pheasant tail fibers.
ABDOMEN – Butts of ring neck pheasant tail fibers.
RIB – Fine copper wire (size to hook size-small. or ex-small).
SHELLBACK – Ring neck pheasant tail fibers.
LEGS – Tips of shellback fibers.
THORAX – Peacock herl.HOW TO TIE
- Debarb the hook- put bead on if used (small hole first and push it to the eye)- mount in vise – start your thread behind the eye (or bead head) and lay a thread base all the way to just before the bend of the hook. Now select three or four long tail fibers from the tail of a ring necked pheasant and Measure them up against the hook shank they should be the length of the hook shank, and tie them in at the rear of the shank where your thread is now and the tips to the rear, about a gape long (This is your tail), secure the butts down on the shank and stop at halfway to two-thirds of the shank. Pull the butts back over what you just tied in and wrap back over them again till you get to the base of the tail again do not cut the butts off we will wrap this like herl later to make the body (Abdomen).
- Clip 2 or 3 inches of fine copper wire for the rib. Tie in at the base of the tail with tight wraps and the longer part hanging toward the rear of the hook. Now bring your thread forward to where you ended the pheasant tail then take the pheasant tail butts you should have at the rear of the hook and wrap them forward half way to two thirds up the shank of the hook, then tie off and clip off the tag end (extra fibers) – If you end up not having enough fibers just tie off what you have then tie in another couple fibers and keep going.
- Advance your thread to about two or three eyelets space from the eye, select six or so fibers from the same pheasant tail feather that you used for the tail and body (This will be your shellback or wing case and legs) then even up the tips of the fibers by pulling the fibers straight out before cutting them from the feather stem and measure the tips about the length of the hook shank and tie in where your thread is now and the tips hanging over the eye of the hook (about 3 or 4 eyelets long) and on the top of the shank (These will be reversed later for your legs of the fly). Wrap the thread rearward over the butts of the fibers and end tight to the front of the abdomen don’t clip butts yet this will be used later (This will become the shell back or wing case later).
- Tie in two or three peacock herl fibers by the tips and at the base of the shell back (front of abdomen). Make a herl rope if you want- by lightly twisting the herl around the thread in a clockwise direction then wrap the peacock herl rope forward and stop one eyelet space from the eye and tie off and clip off the tag end of the herl (You will need this slight gap between the eye and the end of the thorax to tie off the shell back and form a head). Counter wind the copper wire at the rear of the fly forward thru the pheasant tail abdomen and the peacock herl thorax and end it and tie off just behind the eyelet, the wire can be clipped off with some dull scissors or just put a little pressure with your finger on one hand at the point you want it to break off and with the other hand just bend the wire back and forth with a little pressure and it will give. This is called helicoptering it off.
- Draw the shell back fibers over the peacock herl thorax, and tie them off tightly in the gap between the thorax and the hook eye then clip off the tag end of the pheasant tail fibers (Make sure you leave enough room for the head of the fly).
- Separate three leg fibers (hanging over the eyelet) to each side. If you don’t have that precise number, don’t worry – trout can’t count. Pull the fibers back along the side of the fly. Take one turn of thread over them to lock them in place -Pull the fibers back and down along the side of the fly - make any adjustments needed to get the legs in place then take another turn of thread to lock them in place. They should slant back and slightly down. Form a neat head behind the eyelet, whip finish and cement the head.
TIE UP A DOZEN OR TWO – AND GO FISHING*** But remember to practice C.P.R. (CATCH – PICTURE – RELEASE)