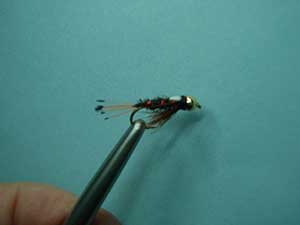
The Royal Flush
Skip Morris
Edited by CARL WUEBBEN
The royal coachman dry fly stands as the flagship for all “attractor” fly patterns, flies designed not so much to imitate fish food as to satisfy flights of the imagination and the Royal Coachman is well known to any serious fly fisher and it has a record of over a hundred years of catching trout. So it was a great model for the Royal Flush nymph. Fanciful as it clearly is, the Royal Flush is arguably not entirely unnatural. The mayfly ameletus’s three nymphal tails are tipped with contrasting color along the lines of the Royal Flush’s golden pheasant tippets and the white wing case could remind trout of a whitish nymph having just shed an exoskeleton, as mayflies do numerous times throughout their underwater lives. The dark and shining herl body is a long proven approach to artificial nymph design, as is the brown hackle half-collar. Still, nothing is going to explain away that golden bead. Perhaps attractor flies work precisely because they look unlike anything a fish ever ate. No one knows for sure. But attractors do work, sometimes far better than solid imitations.
PATTERN
HOOK – Heavy wire, 1x long (standard nymph hook), humped shank is optional, sizes #16-#10
BEAD – Gold metal, 3/32 – inch for size 16 hooks 7/64 – inch for size 14, and 1/8 – inch for size 12 and 10
WEIGHT – Lead or lead – substitute wire, 0.015-inch (could go larger on bigger hooks)
THREAD – Black or red 6/0 (140 denier) or 8/0 (70 denier). Try the red sometime it kicks up the brightness factor a solid notch.
TAIL – Golden pheasant tippets.
RIB – Fine red copper wire over red flashabou.
ABDOMEN – Two or three peacock herls
WING CASE – Clear stretch flex, scud back, or medallion sheeting, 1/8 –inch wide (this clear strip is optional), over white duck primary, goose shoulder, or any white feather section.
THORAX – Same peacock herl used for the abdomen.
HACKLE – Brown hen neck, as a half-collar
HOW TO TIE
- Debarb hook – put the bead on the hook (small hole first) - mount in the vise then wrap your lead or none lead wire on up the full length of the shank. Make the ends tidy by pushing the ends up against the shank. Push the lead firmly into the rear of the bead. The lead and bead will now cover about two thirds to three quarters of the shank.
- Start your thread in just before the bend of the hook and behind the lead wraps. Tie in a small bunch of pheasant tail tippets on top of the shank (tips hanging rearward), at the hooks bend where your thread is now, this will be your tail and it should be half to two thirds the length of the shank. Wrap the thread up the fibers and shank to the rear of the lead. Trim off the butts of the fibers closely, so they lie right up against the lead.
- Tie in some fine red copper wire at the rear of the lead wraps to the bend of the hook. Hang the larger end toward the rear of the hook and put it in your material clip to get it out of the way for now. Keep all your materials right up against the lead wire for a smooth underbody.
- Double a full length of red flashabou over the thread then bind the doubled end against the rear of the lead (on top of the shank) and then down to the tail.
- Grab three peacock herls (two for smaller hooks) and align the tips, then clip off about a half inch of them (tips). Tie the herl in by their cut tips right behind the lead wrappings and wrap back to the tail again for that smooth underbody. Spiral wrap the thread forward to about a little past the halfway mark. Wind the three herls together halfway up the shank- toward you over the top and away from you beneath the hook, (counter clockwise) the opposite of the usual direction- and then bind them there, but don’t cut them.
- Put a couple more wraps on the herl then pull them back and put a few thread wraps on to hold them back. Now where your thread is now (mid shank – right in front of the peacock) tie in a strip of clear stretch flex or the like. On top of the clear strip tie in a section of white duck primary or any white feather will do. Make it slightly smaller than the hook gape wide and tie them in good and trim off any tag ends but remember to keep that smooth underbody.
- Spiral wrap the thread to the rear of the bead. Now wind the remaining herl to the rear of the bead also but remember to wrap in the reverse direction like before (start it close to the other herl).Tie off the herl behind the bead then clip the herl tag ends as close as you can.
- Pull the wing-case materials up and forward; then with a couple loose thread wraps bind them down (temporarily) behind the bead head. Now with one strand of the flashabou that’s at the rear of the hook (the second one is a backup strand) spiral wrap forward in three to five turns to the rear of the wing case (clear strip and feather) and going in a normal direction (clockwise) when you’re at the wing case back off your thread holding the wing case and lift the wing case up so you can continue wrapping the flashabou to the bead in two or three turns. Tie it down and trim off any tag ends. If all went well, trim off the second, back up, strand at the bend or if the first broke you get to use the second one.
- Pull the wing case materials forward again to temporarily hold the in place with a couple loose wraps. Now with the wire at the tail wrap over the flashabou, tightly, right in its tracks, to the wing case. Now back off the thread wraps holding the wing case and continue wrapping the wire over the flashabou all the way to the bead, then tie off and clip off the tag ends (wire or flashabou).
- Select a hen hackle appropriate to the size of your hook using a hackle gauge or just hold up to the hook shank and fold it over to see if it’s about a gape and a half size. Strip the fibers off the hackle base (butt side), and tie the hackle in by its bare stem up against the bead (butt side facing to the bend) and the main part of the feather facing forward over the bead and eyelet. Wrap the thread backward about three close turns and trim off the butt tag ends.
- Wind the hackle back in three close turns, then wind the thread forward, through the fibers to the bead (rock the thread back and forth as you wrap so you don’t lay down any feather fibers). This makes a very strong hackle collar – its stem is crossed and reinforced by thread three times.
- Pinch down the hackle fibers firmly, so they sweep back. Part the hackle fibers on top so they go to each side and then pull the white feather section forward and down – tie off behind the bead. Now do the same with the stretch strip and tie off on top of the white feather and behind the bead head. Trim off the tag ends of stretch strip and feather – whip finish – clip your thread – add head cement to the whip finish and your done.
TIE UP A DOZEN OR TWO – AND GO FISHING*** But remember to practice C.P.R. (CATCH – PICTURE – RELEASE)