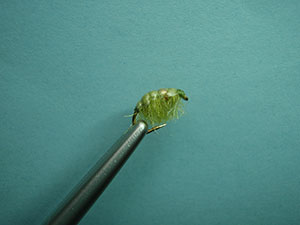
Pregnant Scud
Translated by CARL WUEBBEN
According to ANDREW PULS who earned his master’s degree as a fisheries biologist, there are sound reasons for tying the pregnant scud. Scientific research has demonstrated that orange segmented scuds suffer increased predation from trout, probably due to the crustacean’s increased visibility in the water. The orange bead in the middle of the body of the pregnant scud mimics a scud that is either full of eggs or has become infected by a parasite. The pregnant scud works especially well when you need a pattern containing a dash of flash or when fishing heavily pressured water. The fly has a unique, realistic look that most other anglers overlook.
PATTERN
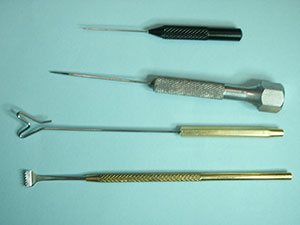
HOOK – Mustad C49S, Tiemco 2457 – 2487 – 2488 or any bent shank scud hook sizes #14 - #12
THREAD – Olive 8/0 (70denier)
BEAD – Orange glass bead (10/0 seed beads work from JO-ANNS)
BODY – Light – olive sow-scud dubbing
SHELLBACK – A strip clipped from a plastic freezer bag.
RIB – 5X clear monofilament
HOW TO TIE
- Debarb hook- put bead on the hook – mount in the vise and start thread in at the rear of the hook (push bead to the eyelet). Now tie in your 5X ribbing.
- Cut a piece of clear plastic freezer bag about a gape width (or side center to side center) then clip one end to a point and tie it in with the point forward and the rest hanging to the rear (slightly into the bend of the hook).
- Now dub the rear body one of two ways,
By hand = Pull a small length of thread out from the bobbin (about 3 inches) and put some dubbing wax on it, then twist on your dubbing with your fingers in either a clockwise or counterclockwise direction between your thumb and index finger just pick one or the other direction and stick with it.
With dubbing loop tool = bring about three inches of thread downward and put your dubbing tool on the thread then keep a hold on the tool with your left hand (for right handers) and bring your thread back up to the hook shank where your thread was started and put a few wraps back over the back part of what now is your dubbing loop. Put some dubbing in the entire loop and twist it till it’s tight. Bring your thread to the center of the hook shank. Now with either method wrap you dubbing forward to just before the halfway mark and tie and clip the end of the loop off then bring your bead up against your rear dubbed body and bring your thread over the top of the bead to the front of it and make a small dam in front of it to keep it in place better or you can whip finish the rear body –clip the thread- then push your bead up against the rear body and restart your thread then a thread dam in front of the bead.
- Put some more dubbing on your thread like in part #3 and dub the front body but keep it close to the bead and wrap it forward to about 1 ½ eyelets space from the eye and tie off the dubbing thread or loop if you used it then use a dubbing rake or bodkin to pull out the fibers and pull them downward to the side.
- Bring your plastic shellback over the top of the fly and try to get as much fibers from the dubbing to go down each side then stretch it a little and tie of in front where your thread is now. Clip off any excess plastic.
- Now counter wrap your ribbing forward and tie off in front where your thread is now. You should space it out to have 3 sections behind the bead and 2 sections in front of it with a total of 6 with the bead. Build a small tapered head – whip finish it then add a little head cement or UV glue.
- With your bodkin or a dubbing rake pick out some of the hair on the bottom of the fly so it looks more buggy.
TIE UP A DOZEN OR TWO – AND GO FISHING*** But remember to practice C.P.R. (CATCH – PICTURE – RELEASE).