Wee Willy Wiggler
CRAIG RIENDEAU Translated by CARL WUEBBEN
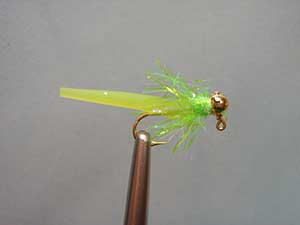
Simple to make – simple to use as you will see, the Wee Willy Wiggler is one of the simplest flies you will ever make. Tie the fly on a jig hook weighted with a small bead head or a jig hook with the weight attached to it already, either way it makes it fall and hang horizontally in the water column much like something alive. The only thing that has changed from the original is it started with saddle hackle, switched to Cul De Canard during the hackle shortage a couple of years ago, and finally settled on Antron Trilobal hackle. The Wee Willy Wiggler is also easy to repair, just keep some superglue handy and you can fix a loose tail or even glue an entire new one. Cast and strip it like a streamer, or dead drift it like a nymph, use a indicator to keep the fly in the strike zone as long as possible without getting hung up or leaving the strike zone. Fish the fly very slowly, twitch it slightly once in a while if you don’t get a strike and vary your depth. Fish rarely spit out this soft- rubber pattern. The Wee Willy Wiggler works on almost every warm water species that get in its way. Bass, Bluegills, Crappies, Carp.
PATTERN
HOOK – Sohumi 103 or your favorite 90-degree jig hook, size 8. (I used Bass Pro Shop jig head ball style 1 /64th #JHNO64 #8 with the weight already on it)
THREAD – 8/0 (70 denier) color to match the body or just white will do.
WEIGHT – 1/8 – inch brass or copper bead (exclude if your hook has it built into it)
UNDERBODY– Krystal flash. (Color to match the body).
BODY – A spine clipped from a giant puffer ball or googly ball from a toy or craft store.
HACKLE – Trilobal Hackle with ¾- Inch fibers (color to match body or white) (I used UV Polar Chenille or palmer chenille or minnow body wrap (bass pro shop) and clipped it some after I was done with the fly).
OTHER - *Lighter (to heat up the bodkin).
*Cup of cool water (To cool the body off).
*Zap-A-Gap or superglue
HOW TO TIE
- Debarb hook – put the bead on (small hole first) then mount in the vise. Push the beadhead forward up against the hook shank bend by the eyelet- start your thread behind the beadhead and build a thread dam behind the bead. Place a drop of Zap-A-Gap or superglue on the dam, and twist the bead until it adheres to the thread.
- Cut two strands of Krystal Flash in half; fold the four strands in half, making a loop containing eight strands of flash. Cut the ends even and tie them to the hook shank behind the bead. Now with the thread wrap the Krystal flash down the hook shank until it’s opposite the hook barb.
- Make a dubbing loop by pulling out about 3 or 4 inches of thread downward and then put your dubbing twister on the thread, then bring your thread upward to the hook shank and starting about one or two eyelets from where you started your loop and wrap backward over your other piece of thread for the loop then forward and stop at the bead head.
- Place the Krystal Flash between the two pieces of thread for the loop and spin the dubbing tool to tighten the Krystal Flash and thread together forming a rope. Wrap the Krystal Flash rope up the hook shank staying close to each wrap and going forward toward the bead head and leaving a 1/8 inch gap behind the bead. Tie off and clip off the tag end.
- Clip a 1-inch –long spine from the toy ball. Place the spine flat on the edge of your bench. Using a lighter heat up an old bodkin then melt a 3/8-inch-long groove in the toy ball spine (about the same length as your Krystal Flash underbody that is on the shank now)the depth of the groove equals the thickness of the bodkin needle. Dip the warm spine and bodkin in the bowl of water to cool it then remove the spine body from the bodkin.
- Apply a bead of Zap-A-Gap or superglue to the Krystal Flash underbody (on the top) and with your rotary vise rotate the hook so that the glued edge is facing down, if you don’t have a rotary vise just pull the hook out of the vise and turn it over so the glued edge is facing down then remount the hook into the vise (upside down).
- Place the body on your index finger underneath the hook. Align the groove with the Krystal Flash underbody then quickly press the body into place. Allow the glue to dry fully before going onward.
- Tie the end of the hackle tight against the front of the body of the fly (the spine).
- Make three wraps of hackle between the body and the bead head of the fly and tie off and clip the tag end off then a half hitch if needed then whip-finish it and clip off the thread. A little head cement on the thread wraps can’t hurt.
*** But remember to practice C.P.R. (CATCH – PICTURE – RELEASE).