THE BLUEGILL IT’S –A-BUG
GARY R. YADEN Translated by CARL WUEBBEN
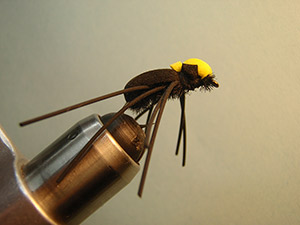
When you tie this pattern expect to catch a few fish with it - even bass like this fly. There are some unique traits to the Bluegill its –a- bug, starting with the foam eyes on the sides of the fly. The second is that the pattern sits on the water with the butt of the fly sinking under the surface; when retrieved with a slight twitch, the entire body rocks on the surface. But best of all, the bluegill it’s-a-bug is easy to tie and is very durable.
PATTERN
HOOK – Mustad 3906b, sizes 10 to 6 for bluegills, larger for bass.
THREAD – Danville’s size A waxed fly master, black or color to match the body.
OVERBODY – Black 1/8 – inch Closed cell foam.
UNDERBODY – Black small to medium chenille, or color to match the overbody.
LEGS – Four 2- inch strips of black square rubber legs.
HEAD – Yellow 1/8 inch closed cell foam.
HOW TO TIE
- Debarb hook – mount in vise – start your thread at just in front of the hook bend – cut a strip of black foam ¼ inch by 1 inch, then cut a pointed tip on one end and tie this end in at the rear of the hook – tie in the chenille on top of the foam and wrap your thread forward to about mid shank.
- Tie in the rubber legs by taking one of the 2 inch legs and double it over the thread in a “v” shape and it facing away from you - then using only the leg material and the thread hanging downward pull the legs up and over the hook shank and onto the side close to you – that’s one pair now advance the thread two or three wraps and tie in another pair – then rotate your vise so you can do the same thing on the other side and you should end up with four legs on each side.
- Cut a strip of yellow foam ¼ inch wide by ¾ inch long for the head – cut a “v” point on one end and tie this end on at the front of the hook with the other end facing toward the eyelet – keep it on the top and don’t crowd the head.
- Wrap the chenille underbody forward making sure to get one wrap between the legs going forward and backward – you can adjust the position of the legs later. Wrap all the way forward and tie off behind the eyelet (don’t crowd the head) clip off the tag end of the chenille.
- Pull the black foam up and over the chenille to form the overbody and tie off where you ended your chenille (by the eyelet). Keep the strip tight and secure it with three or four snug wraps - too tight and it my cut or bend the foam the wrong way. Trim the excess but leave about 1/8 inch.
- Pull the front (yellow) strip back over the 1/8 inch black foam and secure with about three or four good wraps like before – this is the eye – whip finish – clip the thread – trim the excess yellow foam leaving a 1/8 inch long case. Adjust the rubber legs on each side of the body – you should have two sets of legs on each side with one set “V” shaped toward the back and the other “V” shaped toward the front Tie up a bunch - then take a photo of your best one and e-mail it to me and I can critique it for you if you want.
*** But remember to practice C.P.R. (CATCH – PICTURE – RELEASE).