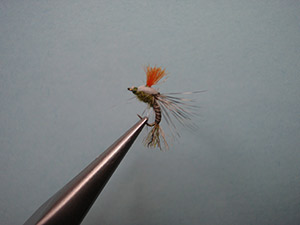
SPLIT-TOP EMERGER (OLIVE AND GRAY)
SCOTT SANCHEZ
Translated by CARL WUEBBENMultipurpose emerger patterns have a permanent home in my fly box. By multipurpose, I mean patterns that match characteristics common to various species of emergers. These patterns help me combat a variety of difficult situations, including fishing unfamiliar waters of facing multiple hatches that are occurring at the same time. Tying the split-top emerger in olive and gray covers a wide range of insects and the pattern is effective in a variety of ways. It imitates not only more than one species but also an emerger that is vulnerable, and it appeals to a trout’s sense of safety. Some emergers become stuck in the shuck or take too much time escaping the meniscus of the water and air. This is the stage the split-top emerger imitates, and it is bad for the bug, but good for the fish. Most aquatic insects in the state of emergence look more alike than different caddis, mayfly, midge, and small stones all blend together one way or another. Dull orange or pink polypropylene is a good compromise of visibility without being gaudy. Also try using CDC for the indicator.
PATTERN
HOOK – Dai-Riki 125 curved emerger hook, or Tiemco 2488 sizes #12 thru #20
THREAD – Olive 8/0
SHUCK – Olive brown Antron
ABDOMEN – Stripped grizzly hackle stem
WING CASE – Gray 1.5 mm or 2mm foam
HACKLE – 1 ½ gap grizzly
INDICATOR – Orange poly.
THORAX – Callibaetis UV2 dubbing
GLUE – Zap-A-GapHOW TO TIE
- Debarb hook – secure in the vise- start your thread about 3 eyelets space from the eyelet then secure the shuck (olive brown Antron) on the top of the hook shank and wrap your thread back toward the bend of the hook while binding down the Antron on top of the hook shank and stopping a little bit into the bend.(This keeps from getting lumps in the abdomen later.) Don’t cut the tag end yet we will do that last so you get the proportion right.
- Grab a not so good quality of grizzly hackle and strip the fibers off the stem by pulling them downward toward the butt of the feather. (Save the good feathers).
- Tie the hackle stem in by the tip along the top of the hook shank at the shuck. Put a small amount of ZAP-A-GAP on the hook shank and wrap the hackle stem up to mid-shank. (This will reinforce the stem).
- Cut a foam strip for the wing case as wide as about ½ to ¾ of the hook gap. Tie the foam strip in at mid-shank.
- Now tie on the better hackle (1 ½ the gap size) at the base of the foam and wrap counterclockwise just a few wraps 2 or 3 ( keep it sparse) around the foam base and tie off in front of the foam – pull back the wrapped hackles on the foam so you can tie off the hackle easier. If you feel it puts too much hackle on you can use a smaller fiber feather or strip one side of the feather off and wrap it on – again 2 or 3 wraps.
- Bring your thread forward and tie in your indicator (Orange poly) in the center of the thorax (In the middle between the foam base and the rear of the eyelet) tips facing forward. Clip off the tag ends and post it by lifting the poly upward and putting a small dam of thread in front of it to keep it standing upward, then bring your thread right up to the front of the base of the poly and going counterclockwise and keeping very close wraps at the base lay down a small bunch of very close wraps (But soft ones) then going up the poly, not to far up though –then back down with a little tighter wraps. You will have to hold the foam and hackle back out of the way to get the posting done without binding down some of the hackle.
- Bring your thread to the base of the foam. Grab your UV2 dubbing and dub a very thin noodle (You can add more if needed) from the foam base to the indicator base and then crisscross under the indicator and just a very small section right in front of the indicator. You will need the space to tie off the foam wing case.
- Take the foam wing case and with a pair of scissors split it down the center and stop just before the base of the foam. Be careful not to clip the hackle. You can also cut the foam before tying it in.
- Pull the two wing case sections (Split foam) around the indicator and over the thorax, and tie off right about in front of the indicator and this should give you enough space so you don’t crowd the head. If the hackle does not end up toward the rear (Like wings) and out the sides (Like legs) you can try putting a little pressure on them as you pull them back and or down or If you have enough hackle out the back and sides (Just a little) then you can clip out what you don’t need. Pull the foam strip a little (One side at a time) tight and clip off close to the base then do the other side the same way. Whip-finish and put a very small amount of ZAP-A-GAP on the thread then clip your shuck (A gap) and you’re done.
*** But remember to practice C.P.R. (CATCH – PICTURE – RELEASE).