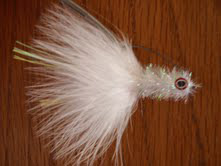
HPU WEEDLESS FLY
(HOOK POINT UP)
BY
DERRICK FILKINSSince Lee Baermann will be our speaker for this month I thought we should tie up a salt water fly that is easy to alter to suit just about any fishing scenario in which you don’t want the fly to get hung up. So unbind yourself from traditional hooks and designs, and you will find new ways to be creative with your tying.
HOOK - 1/0-2/0 or 3/0 - extra – wide – gap or standard worm hook. Bass Pro #033548004636 2/0, Gamakatsu #58411-25 1/0, Mustad #38105bln 2/0
THREAD - White 6/0 or 8/0 or color to match your pattern tied.
SHAFT - 80 pound hard monofilament (I used Hard Mason brand).
TAIL – White marabou.
FLASH- Pearl halo flash. (I used flashabou mirage opal).
EYES - 3-D or 2-D holographic eyes or flat stick on eyes, which are considerably lighter in weight.
BODY – Pearl crystal chenille or estaz opalescent white,
ADHESIVES - Zap-a-gap, plus Zap-a-gap gel or aquaseal.How to Tie
- Debarb hook and put to the side (This will help the marabou tail pass through freely). Place a short piece of the hard mason monofilament into the vice. (About the size of the hook – you will trim later). Tie in thread about one-eighth inch starting at the vise and moving forward just as thought the monofilament were the shank of a hook. Cover the thread base with Zap-a-gap.
- Tie in the marabou and holo flash on the top, bottom and sides of the strand of mono.The length and the amount will depend on the size of the baitfish you want the fly to imitate. A little bit of Zap-a-gap will keep it from moving around.
- Tie in a short piece of crystal chenille onto the mono, and wind the thread forward to the position where the mono will be tied to the hook. Before you start winding the chenille forward, measure the distance between the point of the hook and the beginning of the flat forward surface where you will start tying the mono to the hook (The length of the body) Mark the mono with a pen so you have a reference point. Wind the chenille forward, and tie off at the point where you stopped the forward thread wraps, at that spot, Put in a couple of half hitches to keep the material in place. Leave the tag end of the chenille for finishing the fly.
- Remove the mono body from the vice and use some cutting pliers to remove the section of mono that was held by the vise. Immediately in front of the chenille, Flatten the hard mono with a smooth surface flat pliers so it will make it easier to tie onto the hook. Put the hook into the vise (Upside down) and make a few wraps over the mono and onto the hook just behind the eye of the hook, positioning the fly so that the tail passes freely through the hook point. You may need to trim the front flat part of the mono to help it fit better over the hook point. Then put some additional wraps of thread onto the mono and hook to really hold it down. Now put some Zap-a-gap onto the thread wraps to hold the mono better onto the hook. Use thin thread since more wraps of thin thread are stronger than a few of heavier thread. Wrap the remaining chenille forward to behind the eye and tie off and whip finish.
- Clip a little bit of chenille out where you will put the eyes in, put some Zap-a-gap gel or aquaseal to fix the eyes to the chenille, and you’re done.
**Quite a unique fly and you can change the colors to suit your baitfish pattern of your choice. Get creative. Can also be used as a freshwater fly. Another option is to use a hackle feather on the body to slow down the sink rate or to keep it from sinking you can add foam to the mono to make it float. Go tie up a bunch and save your best for the fly of the month contest at the next meeting.
TIP Pull the eraser off a pencil and put it on the hook point to keep from getting poked by the point.